その他各種推奨実装パターン
アプリケーションタイプに関らず、AWS Lambda 上での稼働を鑑みた推奨実装パターンを紹介します。
AWS SDKを利用する場合の推奨構成
aws ディレクトリに、AWS SDK (boto3) のラッパークラスを実装して配置し、モジュールとして利用します。
メリットは以下のようになります。
- 再利用性向上
- サーバーレスでは特にAWSサービスの呼出しが多い
- テスト便宜性・保守性向上
- Mock 化のしやすさ
- AWS SDK のバージョンアップや仕様変更による影響範囲を最小化
- コード可読性向上
AWS SDK のみならず、外部API呼び出しやライブラリを利用する際は、同様な構成にすることで上記のメリットを享受できます。
ラッパークラスの例
例えば、以下は S3 にアクセスする部分のラッパークラスの実装例です。
import {
  ListObjectsV2Command,
  type ListObjectsV2CommandInput,
  PutObjectCommand,
  type PutObjectCommandInput,
  S3Client,
} from '@aws-sdk/client-s3'

const client = new S3Client({ region: 'us-east-1' })

export class S3 {
  private s3Client: S3Client

  public constructor() {
    this.s3Client = new S3Client({ region: 'us-east-1' })
  }

  public async putObject(bucket: string, key: string, body: any, metadata = {}) {
    const payload = {
      Bucket: bucket,
      Key: key,
      Body: body,
    } as PutObjectCommandInput
    if (Object.keys(metadata).length) {
      payload.Metadata = metadata
    }
    const command = new PutObjectCommand(payload)
    const uploadRes = await this.s3Client.send(command)
    return uploadRes
  }

  public async getObjectAsString(bucket: string, fileKey: string) {
    const command = new GetObjectCommand({
      Bucket: bucket,
      Key: fileKey,
    })
    const object = await client.send(command)
    return await object.Body?.transformToString()
  }

  public async listObjects(bucket: string, prefix: string, continuationToken = '') {
    const input = {
      Bucket: bucket,
      Prefix: prefix,
    } as ListObjectsV2CommandInput
    if (continuationToken) {
      input.ContinuationToken = continuationToken
    }
    const command = new ListObjectsV2Command(input)
    const response = await this.s3Client.send(command)

    return response
  }
}
API エラーハンドリング
利用する API ルーティングライブラリによって方法変わってくることがありますが、方針としてはエラーハンドラーとカスタムエラークラスを実装して利用します。本カタログでは、以下のようなカスタムエラーを作成する形にしています。
src/sample-api/errors/SampleException.ts
import { HTTPException } from 'hono/http-exception'
import type { StatusCode } from '~/sample-api/exception'

export class SampleException extends HTTPException {
  public errorCode: string
  public statusCode: number

  public constructor(params: { status: StatusCode; errorCode: string; message: string; cause?: Error }) {
    super(params.status, { message: params.message })
    super.cause = params.cause
    this.errorCode = params.errorCode

    Error.captureStackTrace(this, this.constructor)
  }
}
APIのロジックの中で、エラーレスポンスを返したい場合は、以下のように例外(エラー)を投げます。
src/sample-api/services/UserService.ts
  public async getUserFromRdb(userId: number) {
    const result = await this.userDao.findById(userId)

    if (!result) {
      throw new SampleException({
        status: StatusCode.NOT_FOUND,
        errorCode: 'USER_NOT_FOUND',
        message: 'User does not exist in RDB',
      })
    }
    return result
  }
ここで投げられた例外は、以下の ExceptionHandler にて拾われ、API のエラーレスポンスとして返されます。
src/sample-api/errors/ExceptionHandler.ts
import { SampleException, StatusCode } from '~/sample-api/exception'
import { logger } from '~/sample-api/logger'

export const handleException = (err: Error): Response => {
  if (err instanceof SampleException) {
    const body = JSON.stringify({
      code: err.errorCode,
      message: err.message,
    })

    return new Response(body, {
      status: err.status,
      headers: {
        'content-type': 'application/json; charset=UTF-8',
      },
    })
  }

  logger.error('## error thrown in handleException', { err })

  const body = JSON.stringify({
    code: 'UNEXPECTED_ERROR',
    message: err.message,
  })

  return new Response(body, {
    status: StatusCode.INTERNAL_SERVER_ERROR,
    headers: {
      'content-type': 'application/json; charset=UTF-8',
    },
  })
}
Logger
本カタログで推奨する JSON 構造化ログを出力するために、Powertools for AWS Lambda (Python) の Logger を利用したログ出力方法を説明します。
- Powertools for AWS Lambda (Python) - Logger
使い方
以下のようにインスタンス化して利用します。ニーズに項目の増減を行うこともでき、Lambda エントリーポイントの開始時点または logger クラスを別途定義し、初期化と設定(contextの反映)を行うようにしてください。
src/sample-api/logger/Logger.tssrc/sample-event/logger/Logger.ts
import { Logger } from '@aws-lambda-powertools/logger'

const logger = new Logger()

export { logger }
src/sample-event/index.ts
import { logger } from '~/sample-event/logger'

export const handler = async (event: S3Event, context: Context): Promise<void> => {
  logger.addContext(context)
  // ...
}
デフォルトでは、以下のようなログが出力されます。
{
  "level": "INFO",
  "location": "create_news:19",
  "message": "Created new news record - {'news_type': 'sports', 'title': 'sample_news_title', 'content': 'sample_news_conten'}",
  "timestamp": "2025-04-20 01:51:45,781+0000",
  "service": "service_undefined",
  "cold_start": true,
  "function_name": "tester-function",
  "function_memory_size": 256,
  "function_arn": "invoked_function_arn",
  "function_request_id": "aws_request_id"
}
CloudWatch Logs でのログ検索
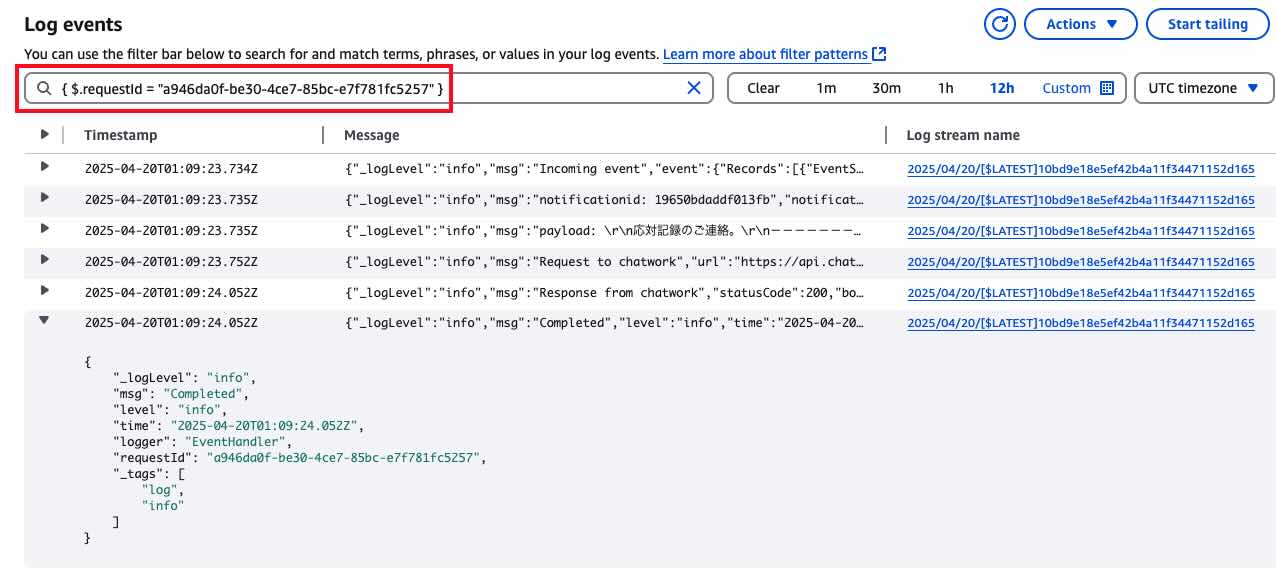
上記のフォーマットを元に、CloudWatch Logs では以下のようにログ検索を行うことができます。
# ログレベルを指定して検索
{ $.level = "ERROR" }

# Request ID を指定して検索
{ $.requestId = “xxx” }
CloudWatch Logs で検索すると、以下のような結果になります。
