How to Use
Directory Structure
serverless-backend-application-stack-python
├── .editorconfig
├── .gitignore
├── .vscode
│   ├── extensions.json
│   └── settings.json
├── build-app.sh   # Shell script to build Lambda deployment packages
├── build-layer.sh # Shell script to build Lambda layer for the PostgreSQL client
├── deploy
│   ├── cloudformation # CloudFormation templates
│   │   ├── apigateway-lambda.yaml
│   │   ├── db.yaml
│   │   ├── s3-lambda.yaml
│   │   └── vpc.yaml
│   └── fixtures
│       └── psycopg3.zip # psycopg3, the Python client for PostgreSQL
├── docker-compose.yml # Docker setup for unit testing and local development
├── poetry.lock
├── pyproject.toml
├── src
│   ├── .init_db.py # Local execution scripts (prefixed with a dot)
│   ├── .init_minio.py
│   ├── .local.sample_api.get_users.py
│   ├── .local.sample_api.post_users.py
│   ├── .local.sample_event.import_users.py
│   ├── sample_api # Sample app: API Gateway + Lambda + PostgreSQL
│   │   ├── actions
│   │   │   ├── create_users_action.py
│   │   │   └── get_users_action.py
│   │   ├── daos
│   │   │   └── users_dao.py
│   │   ├── index.py
│   │   └── services
│   │       └── users_service.py
│   ├── sample_event # Sample app: S3 + Lambda + PostgreSQL
│   │   ├── actions
│   │   │   └── data_import_action.py
│   │   ├── aws
│   │   │   └── s3_client.py
│   │   ├── daos
│   │   │   └── users_dao.py
│   │   ├── index.py
│   │   └── services
│   │       └── data_import_service.py
│   └── sample_users.csv
└── tests
    ├── sample_api # Unit tests for the API Gateway + Lambda + PostgreSQL app
    │   ├── conftest.py
    │   ├── test_create_users.py
    │   └── test_get_users.py
    └── sample_event # Unit tests for the S3 + Lambda + PostgreSQL app
        ├── conftest.py
        └── test_data_import.py
Launching the EC2 Instance
Purchase this AMI from AWS Marketplace. Attach an IAM role to the instance with the AdministratorAccess policy.
Project Setup
Use Poetry, the Python package manager, to install the libraries defined in serverless-backend-application-stack-python.
[ec2-user ~]cd serverless-backend-application-stack-python/
[ec2-user ~]poetry install
VPC Deployment
Deploy the VPC using AWS CLI with a CloudFormation template. After running the command, check the AWS Management Console for the deployment status. Specify appropriate values for --stack-name, AppName, and EnvName according to your environment.
[ec2-user ~]aws cloudformation create-stack \
--region us-east-1 \
--stack-name vpc \
--template-body file://deploy/cloudformation/vpc.yaml \
--parameters \
ParameterKey=AppName,ParameterValue=myapp \
ParameterKey=EnvName,ParameterValue=dev \
--capabilities CAPABILITY_NAMED_IAM
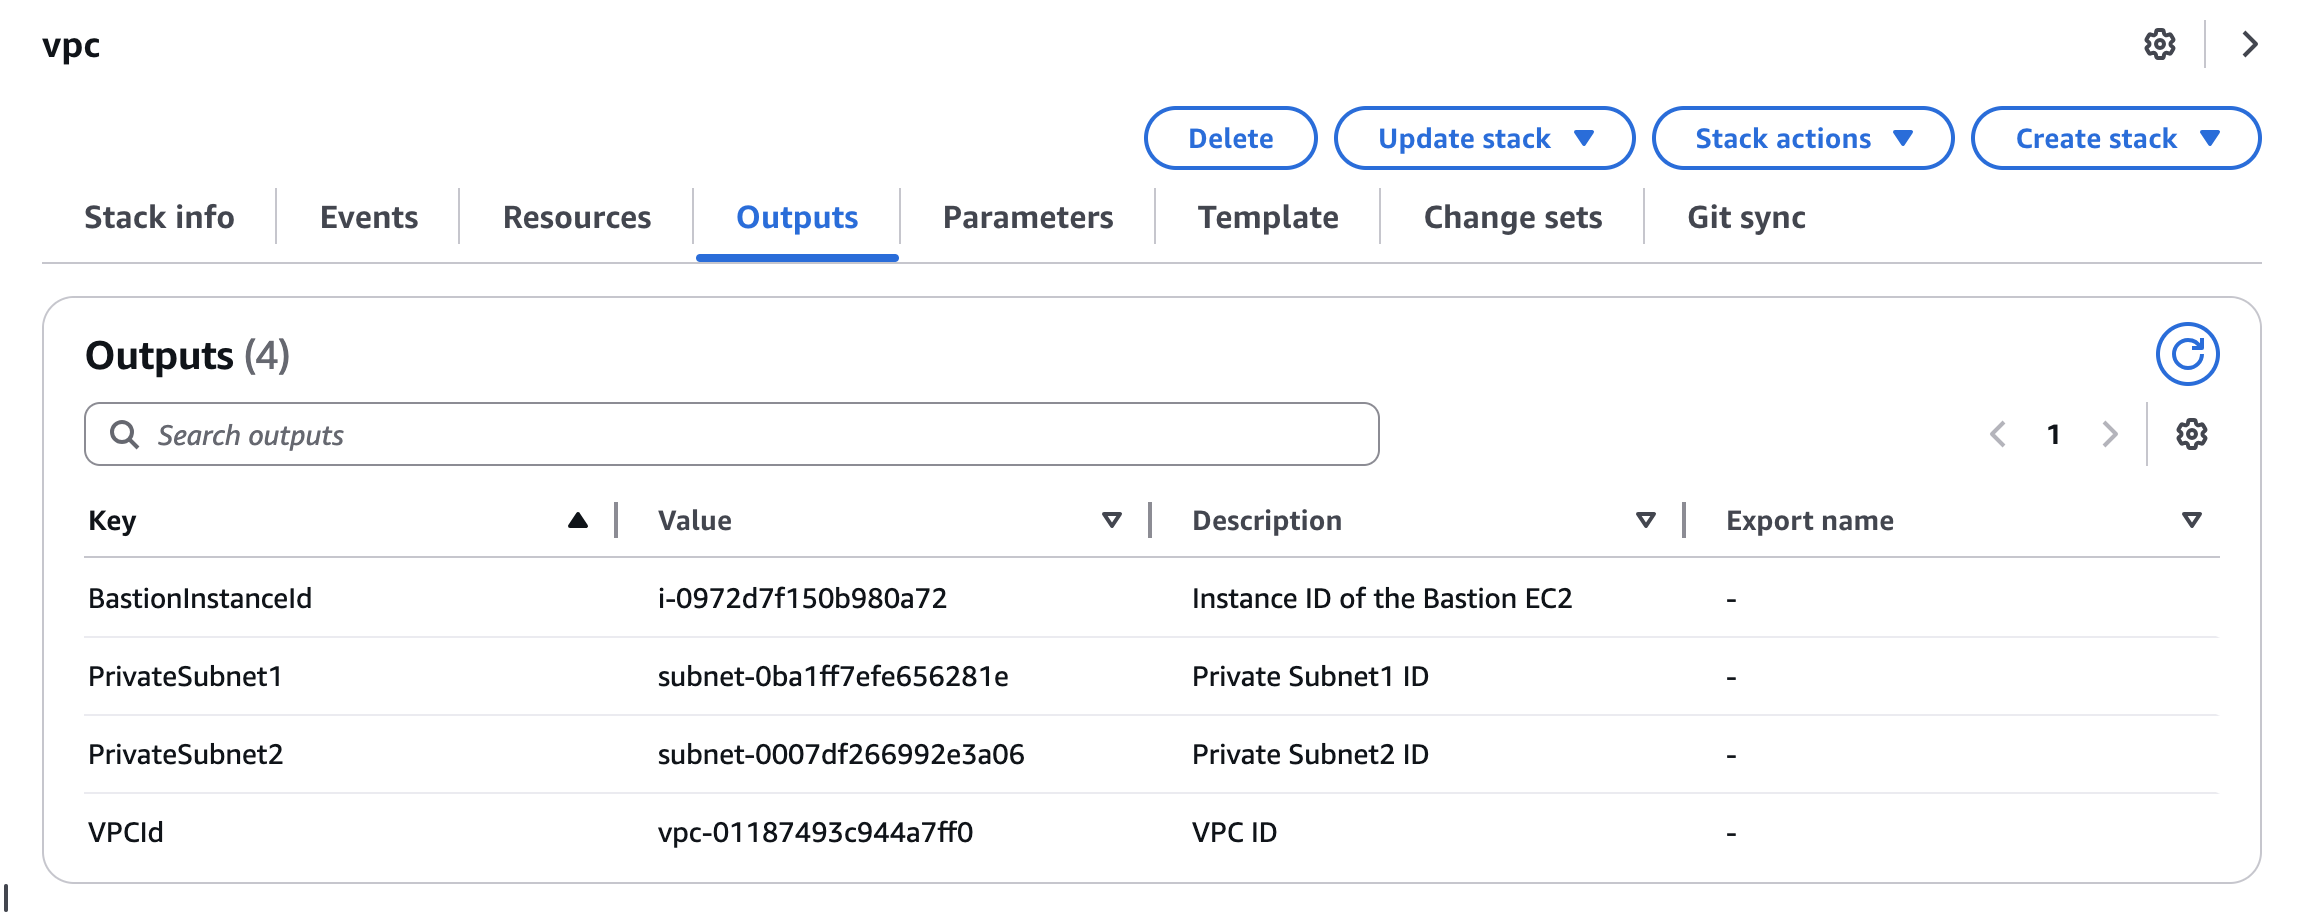
After deployment, check the Outputs tab in the Management Console. The values here will be required for subsequent stack deployments.
Database Deployment
Deploy Amazon Aurora PostgreSQL within the previously created VPC.
[ec2-user ~]aws cloudformation create-stack \
--region us-east-1 \
--stack-name db \
--template-body file://deploy/cloudformation/db.yaml \
--parameters \
ParameterKey=AppName,ParameterValue=myapp \
ParameterKey=EnvName,ParameterValue=dev \
ParameterKey=DBUserName,ParameterValue=postgreAdmin \ # Choose your own value
ParameterKey=DBUserPassword,ParameterValue=SuperSecurePass123 \ # Choose a value with 8+ characters
ParameterKey=VpcId,ParameterValue=vpc-01187493c944a7ff0 \ # Use the value from the VPC stack outputs
ParameterKey=PrivateSubnet1,ParameterValue=subnet-0ba1ff7efe656281e \ # Use the value from the VPC stack outputs
ParameterKey=PrivateSubnet2,ParameterValue=subnet-0007df266992e3a06 \ # Use the value from the VPC stack outputs
--capabilities CAPABILITY_NAMED_IAM
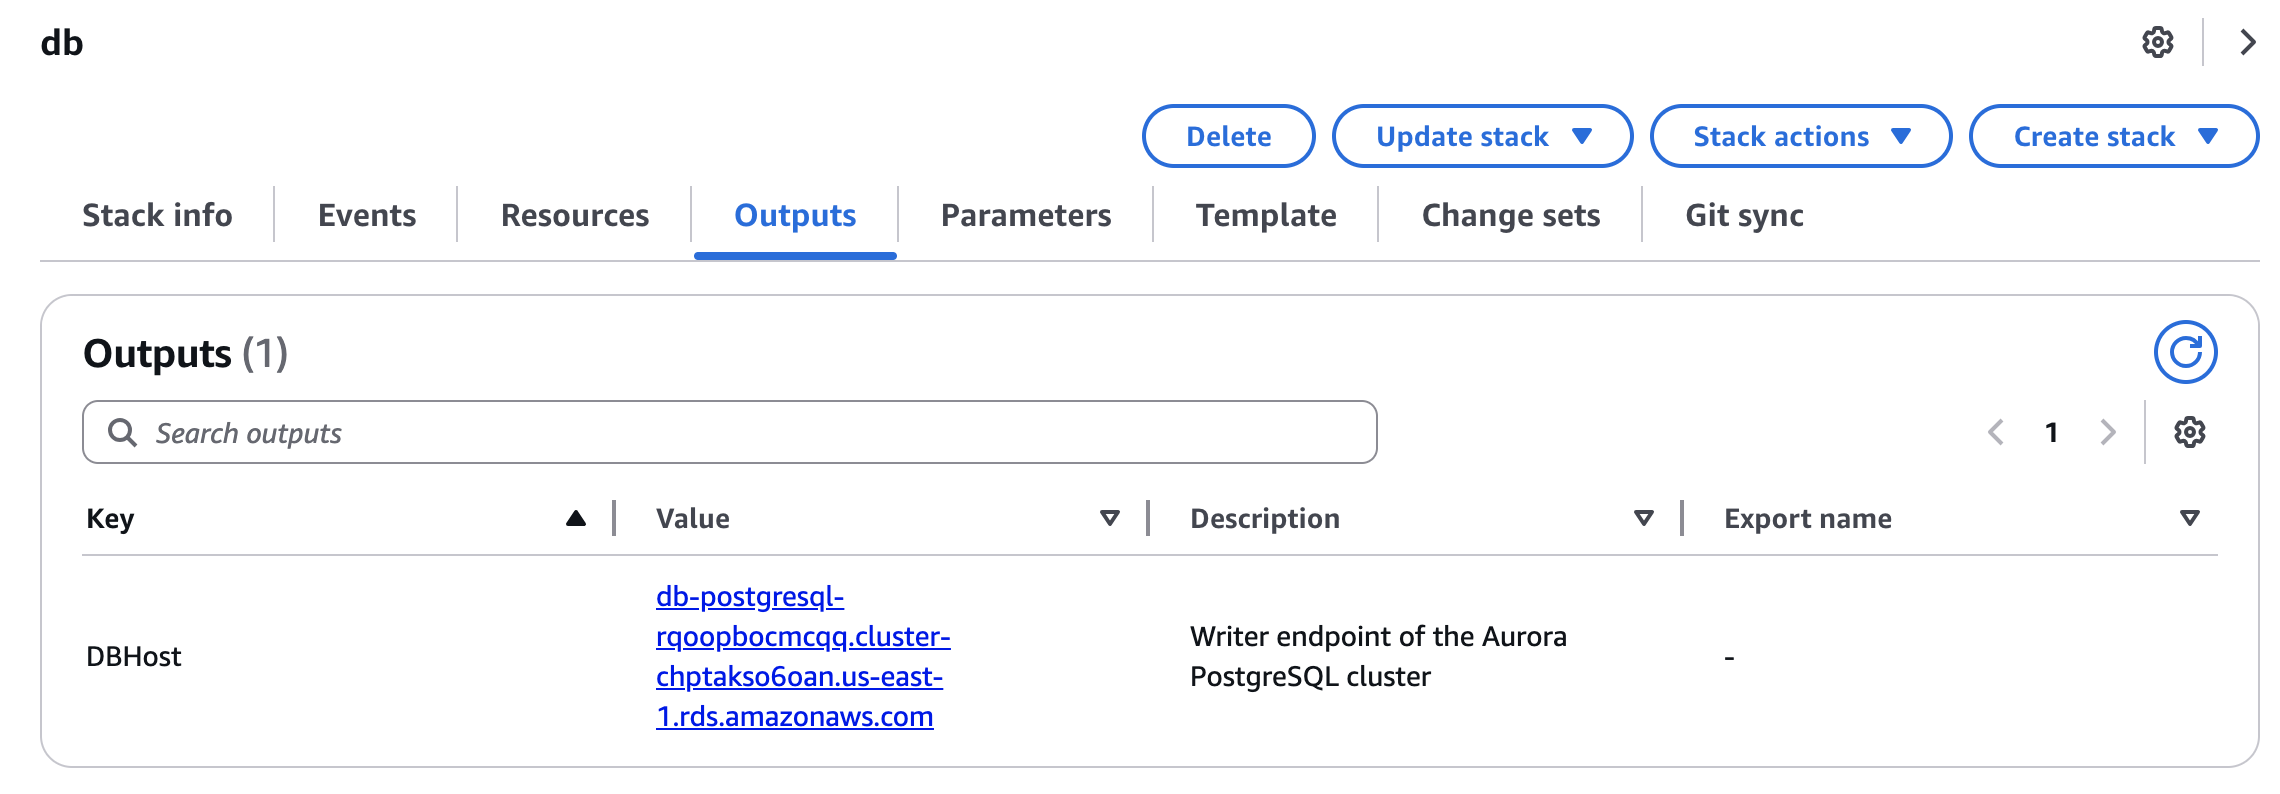
Once the DB deployment completes, check the Outputs tab in the console to find the writer endpoint for the Aurora cluster.
Connecting to the Database from Local
The deployed VPC includes a bastion host with SSM Agent and VPC endpoints configured. Using these, you can port forward from your local machine to connect directly to the DB in the private subnet.
Run the following command to enable port forwarding:
[Local PC ~]aws ssm start-session \
--target i-034fbd3838d455db9 \ # BastionInstanceId from the VPC stack outputs
--document-name AWS-StartPortForwardingSessionToRemoteHost \
--region ap-northeast-1 \
--profile <your aws profile name> # AWS credentials with SSM permissions
--parameters '{"host":["db-postgresql-oqhxwoxfpbev.cluster-cy9ecx9quedk.ap-northeast-1.rds.amazonaws.com"],"portNumber":["5432"],"localPortNumber":["5432"]}'
# Use the DB writer endpoint from the DB stack outputs
Install pgAdmin locally to interact with the database. Follow these steps to set up pgAdmin and create the required database and table for the application:
-
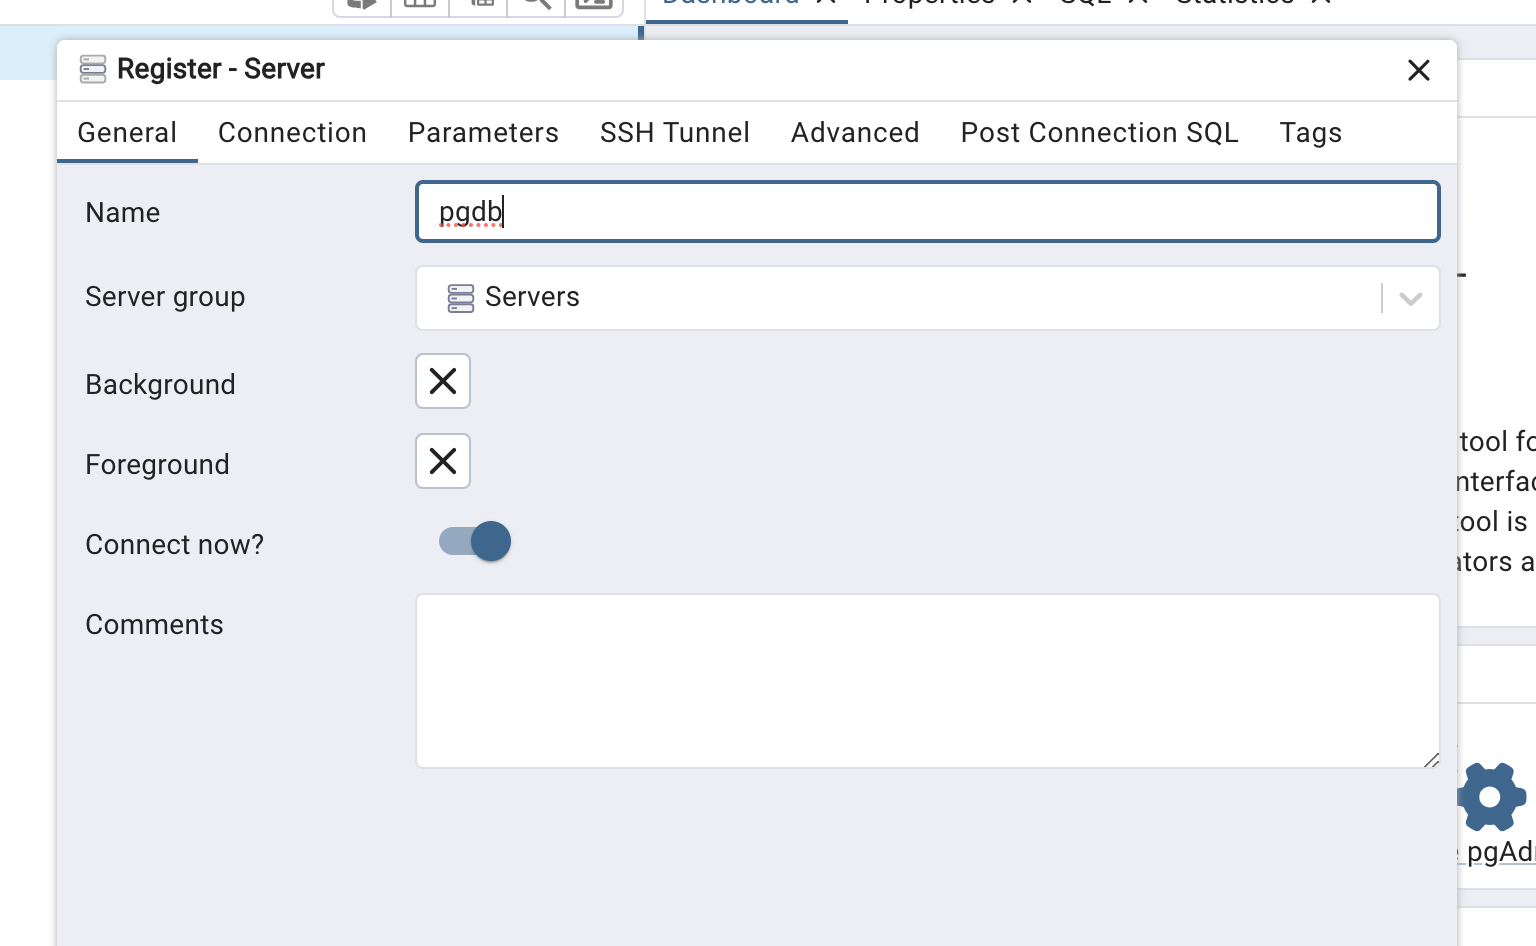
Register the server.

-
Enter any name you like under the General tab.
-
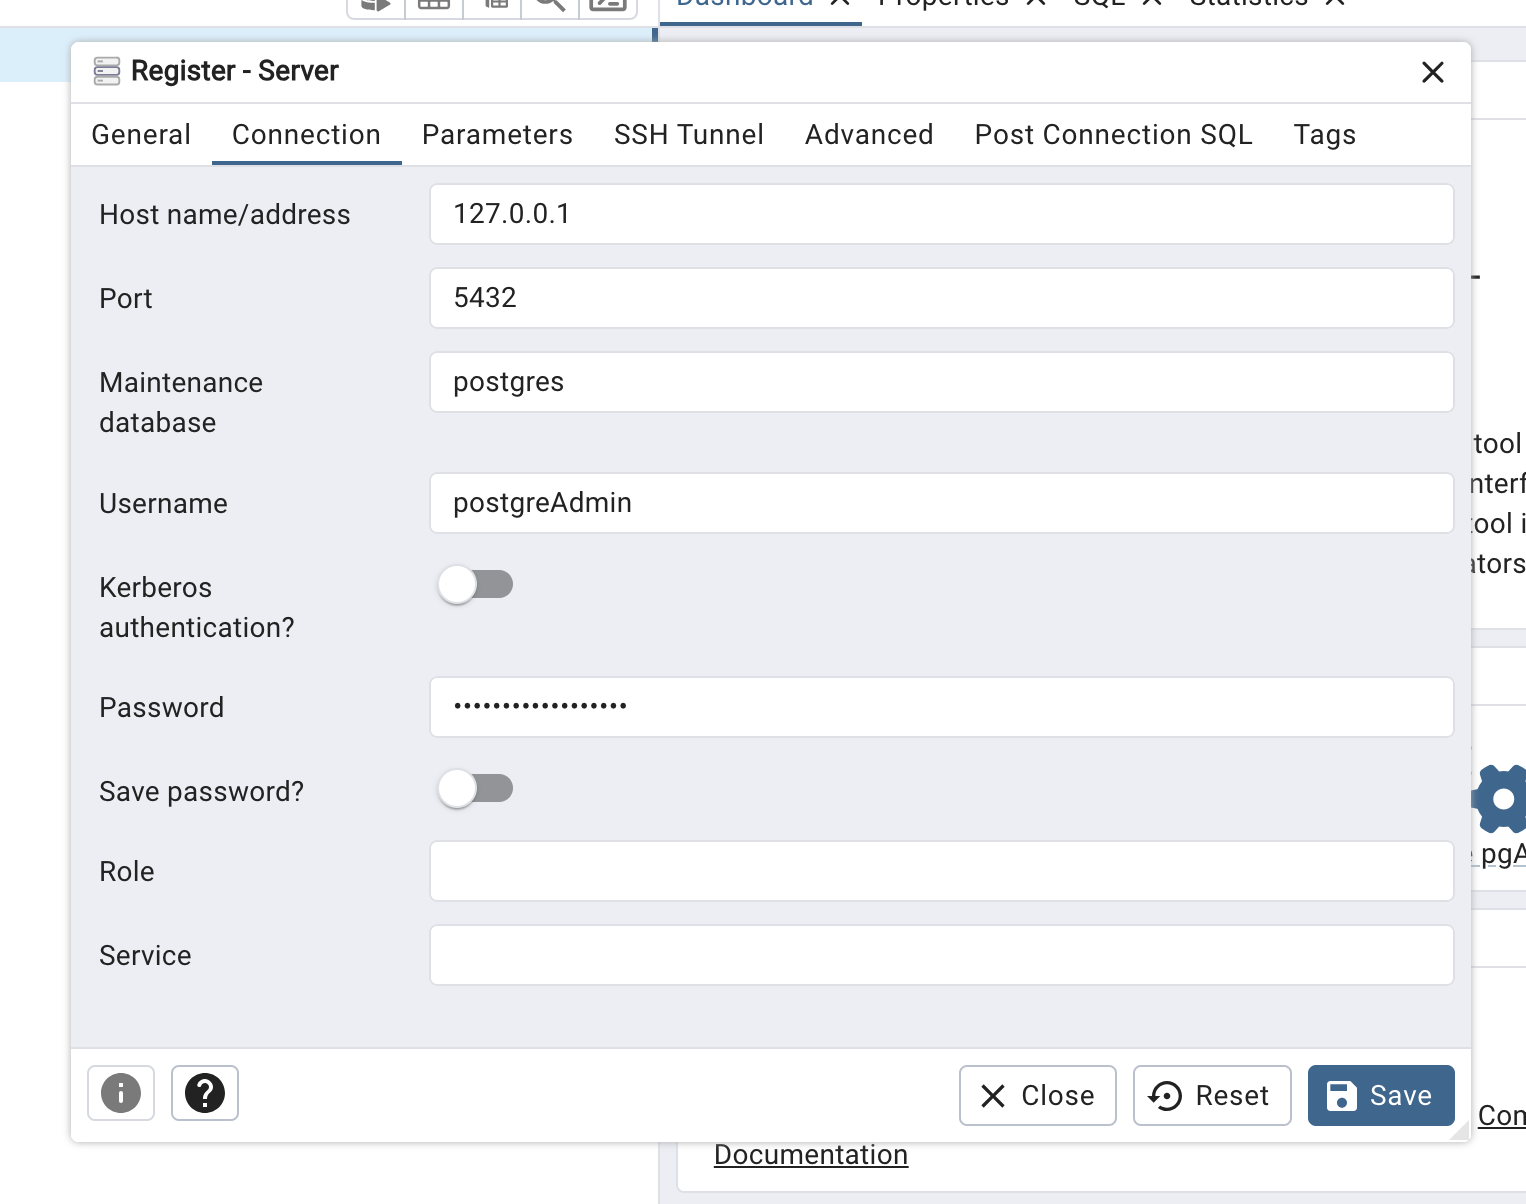
Since port forwarding is used, set Host to 127.0.0.1 or localhost. Enter the username and password provided during CloudFormation deployment. Keep the Maintenance database as postgres.
-
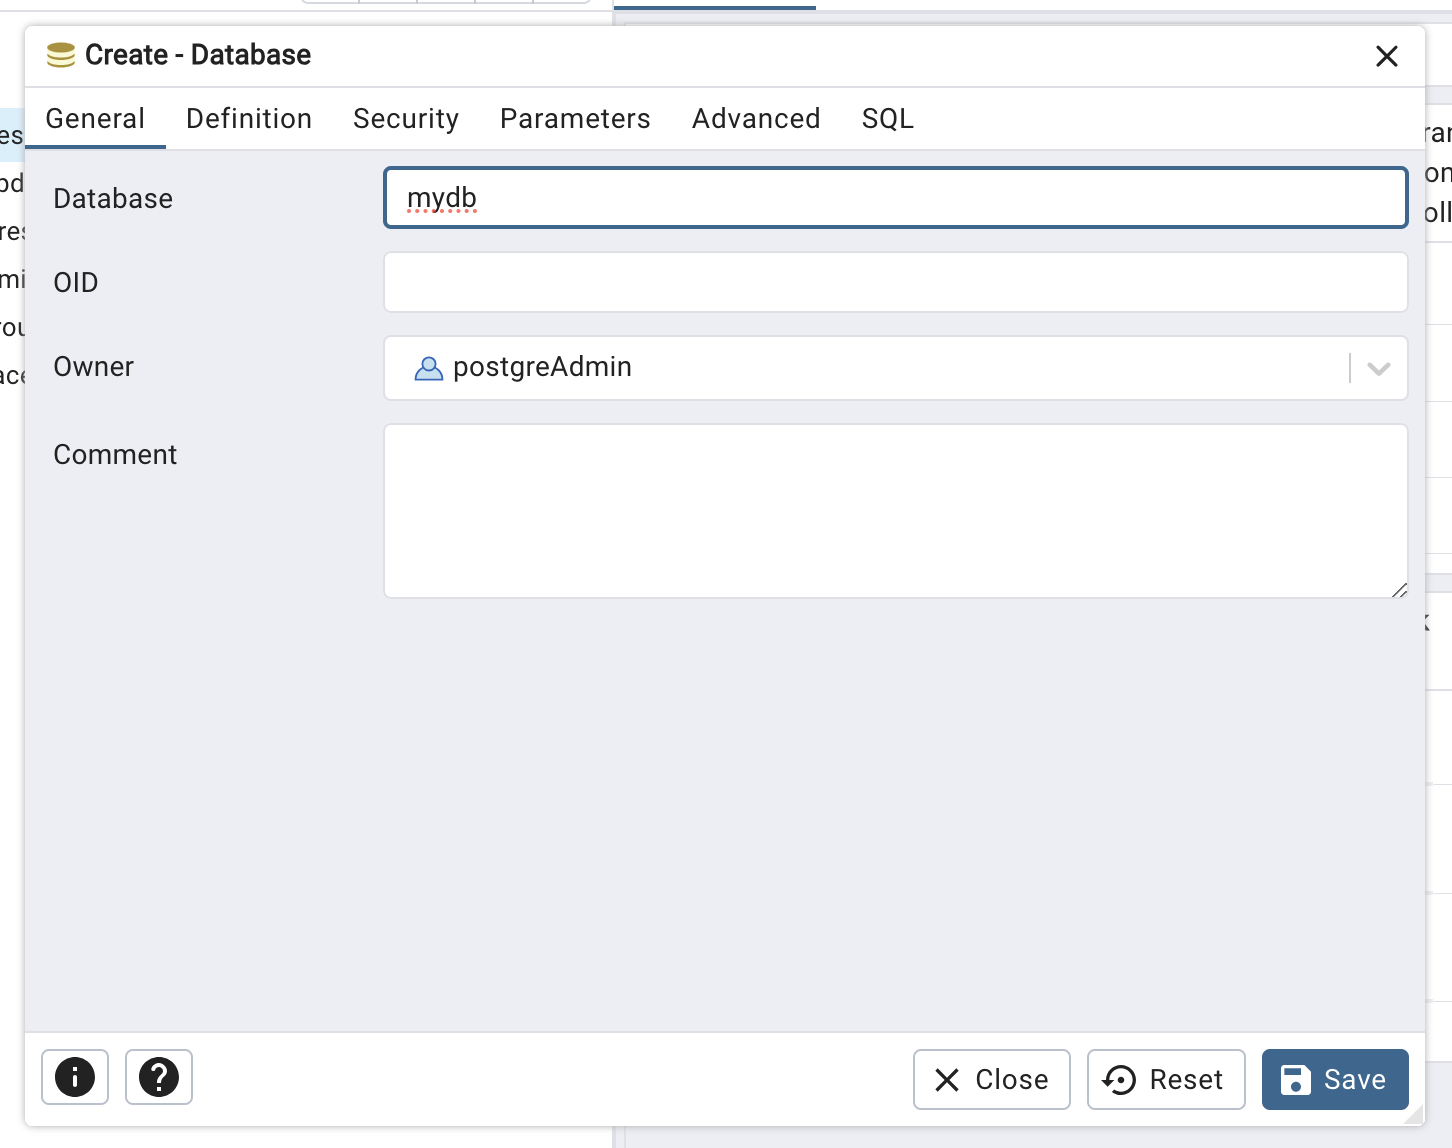
Create a new database.
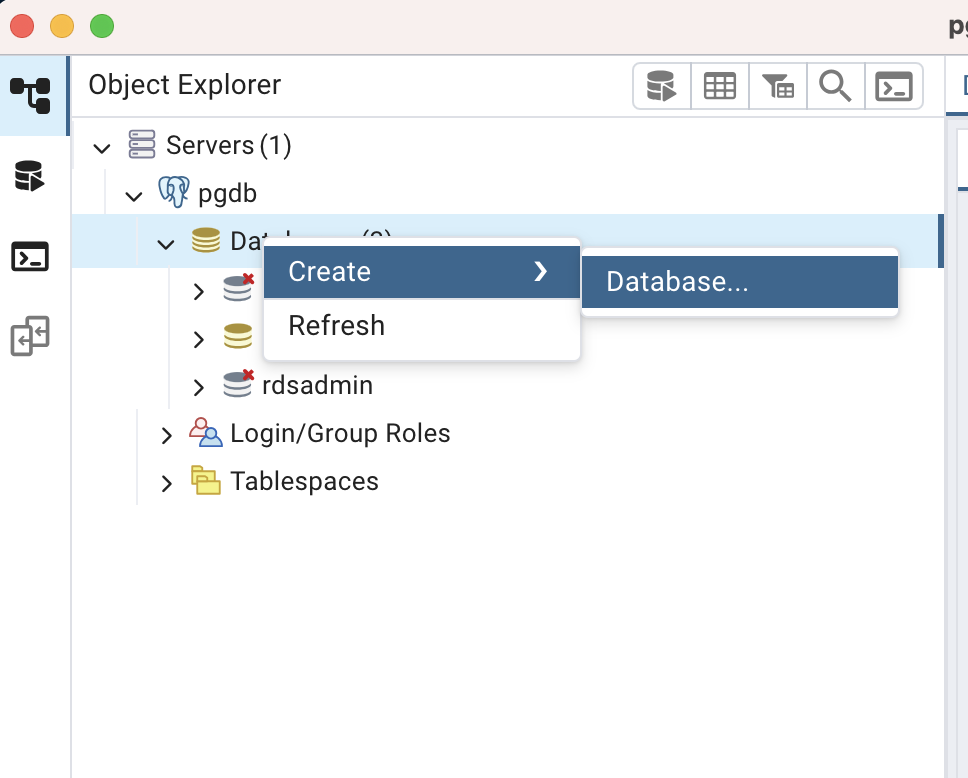
-
You may choose any database name (e.g., mydb). Click Save to create the database.
-
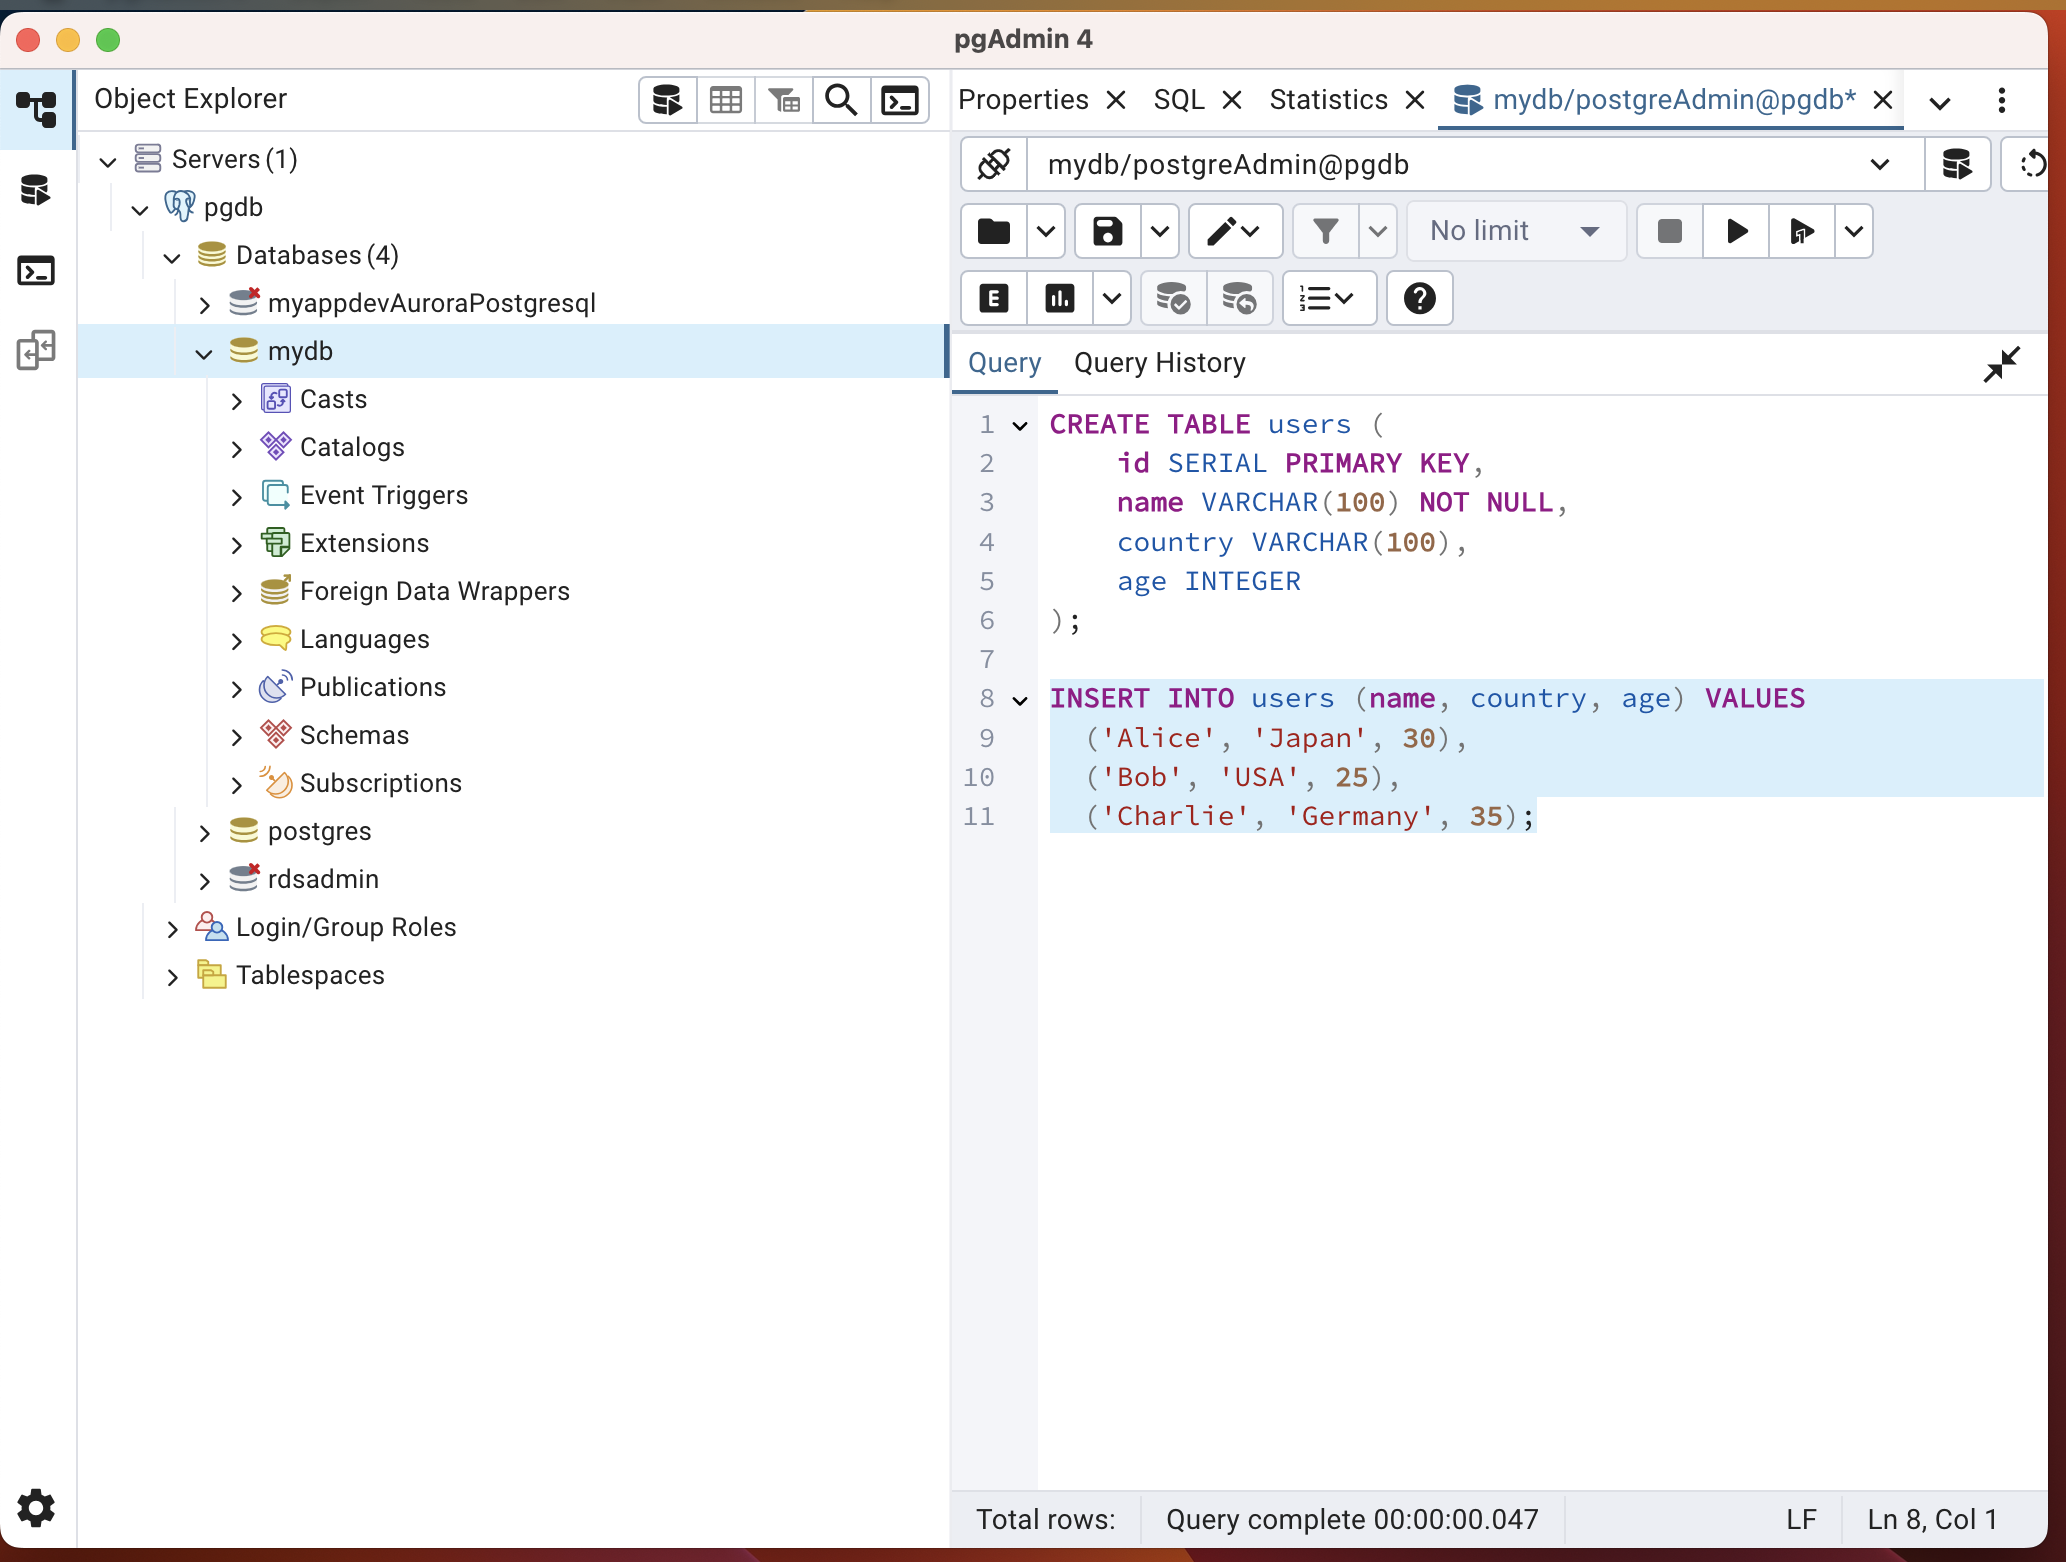
Select mydb, open Query Tool, and create the sample table for the application.
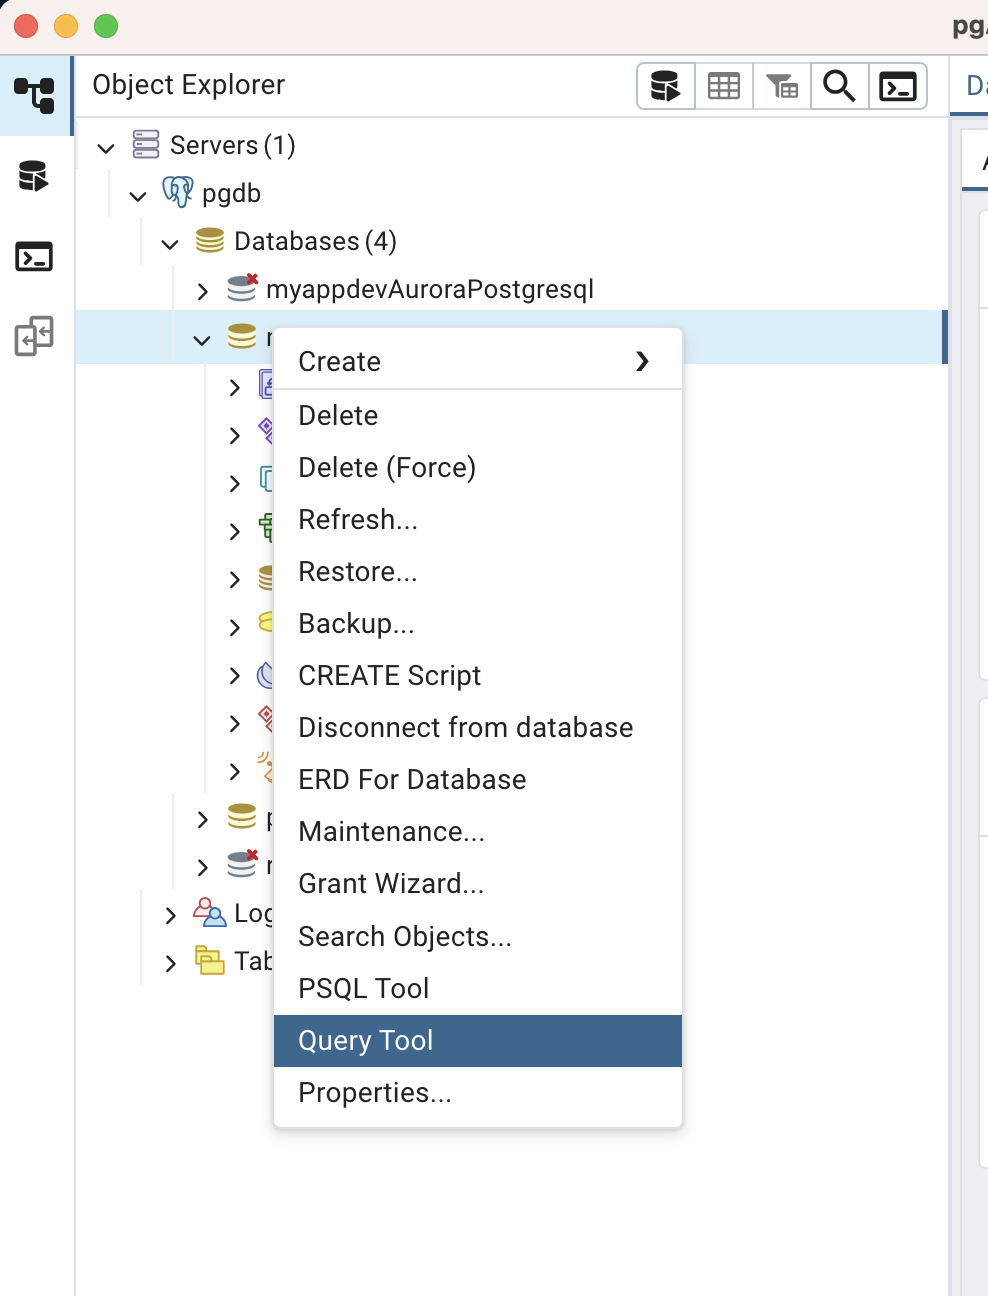
-
Run the following SQL to create the users table and insert sample data:
CREATE TABLE users (
    id SERIAL PRIMARY KEY,
    name VARCHAR(100) NOT NULL,
    country VARCHAR(100),
    age INTEGER
);

INSERT INTO users (name, country, age) VALUES
  ('Alice', 'Japan', 30),
  ('Bob', 'USA', 25),
  ('Charlie', 'Germany', 35);

SELECT * FROM users;
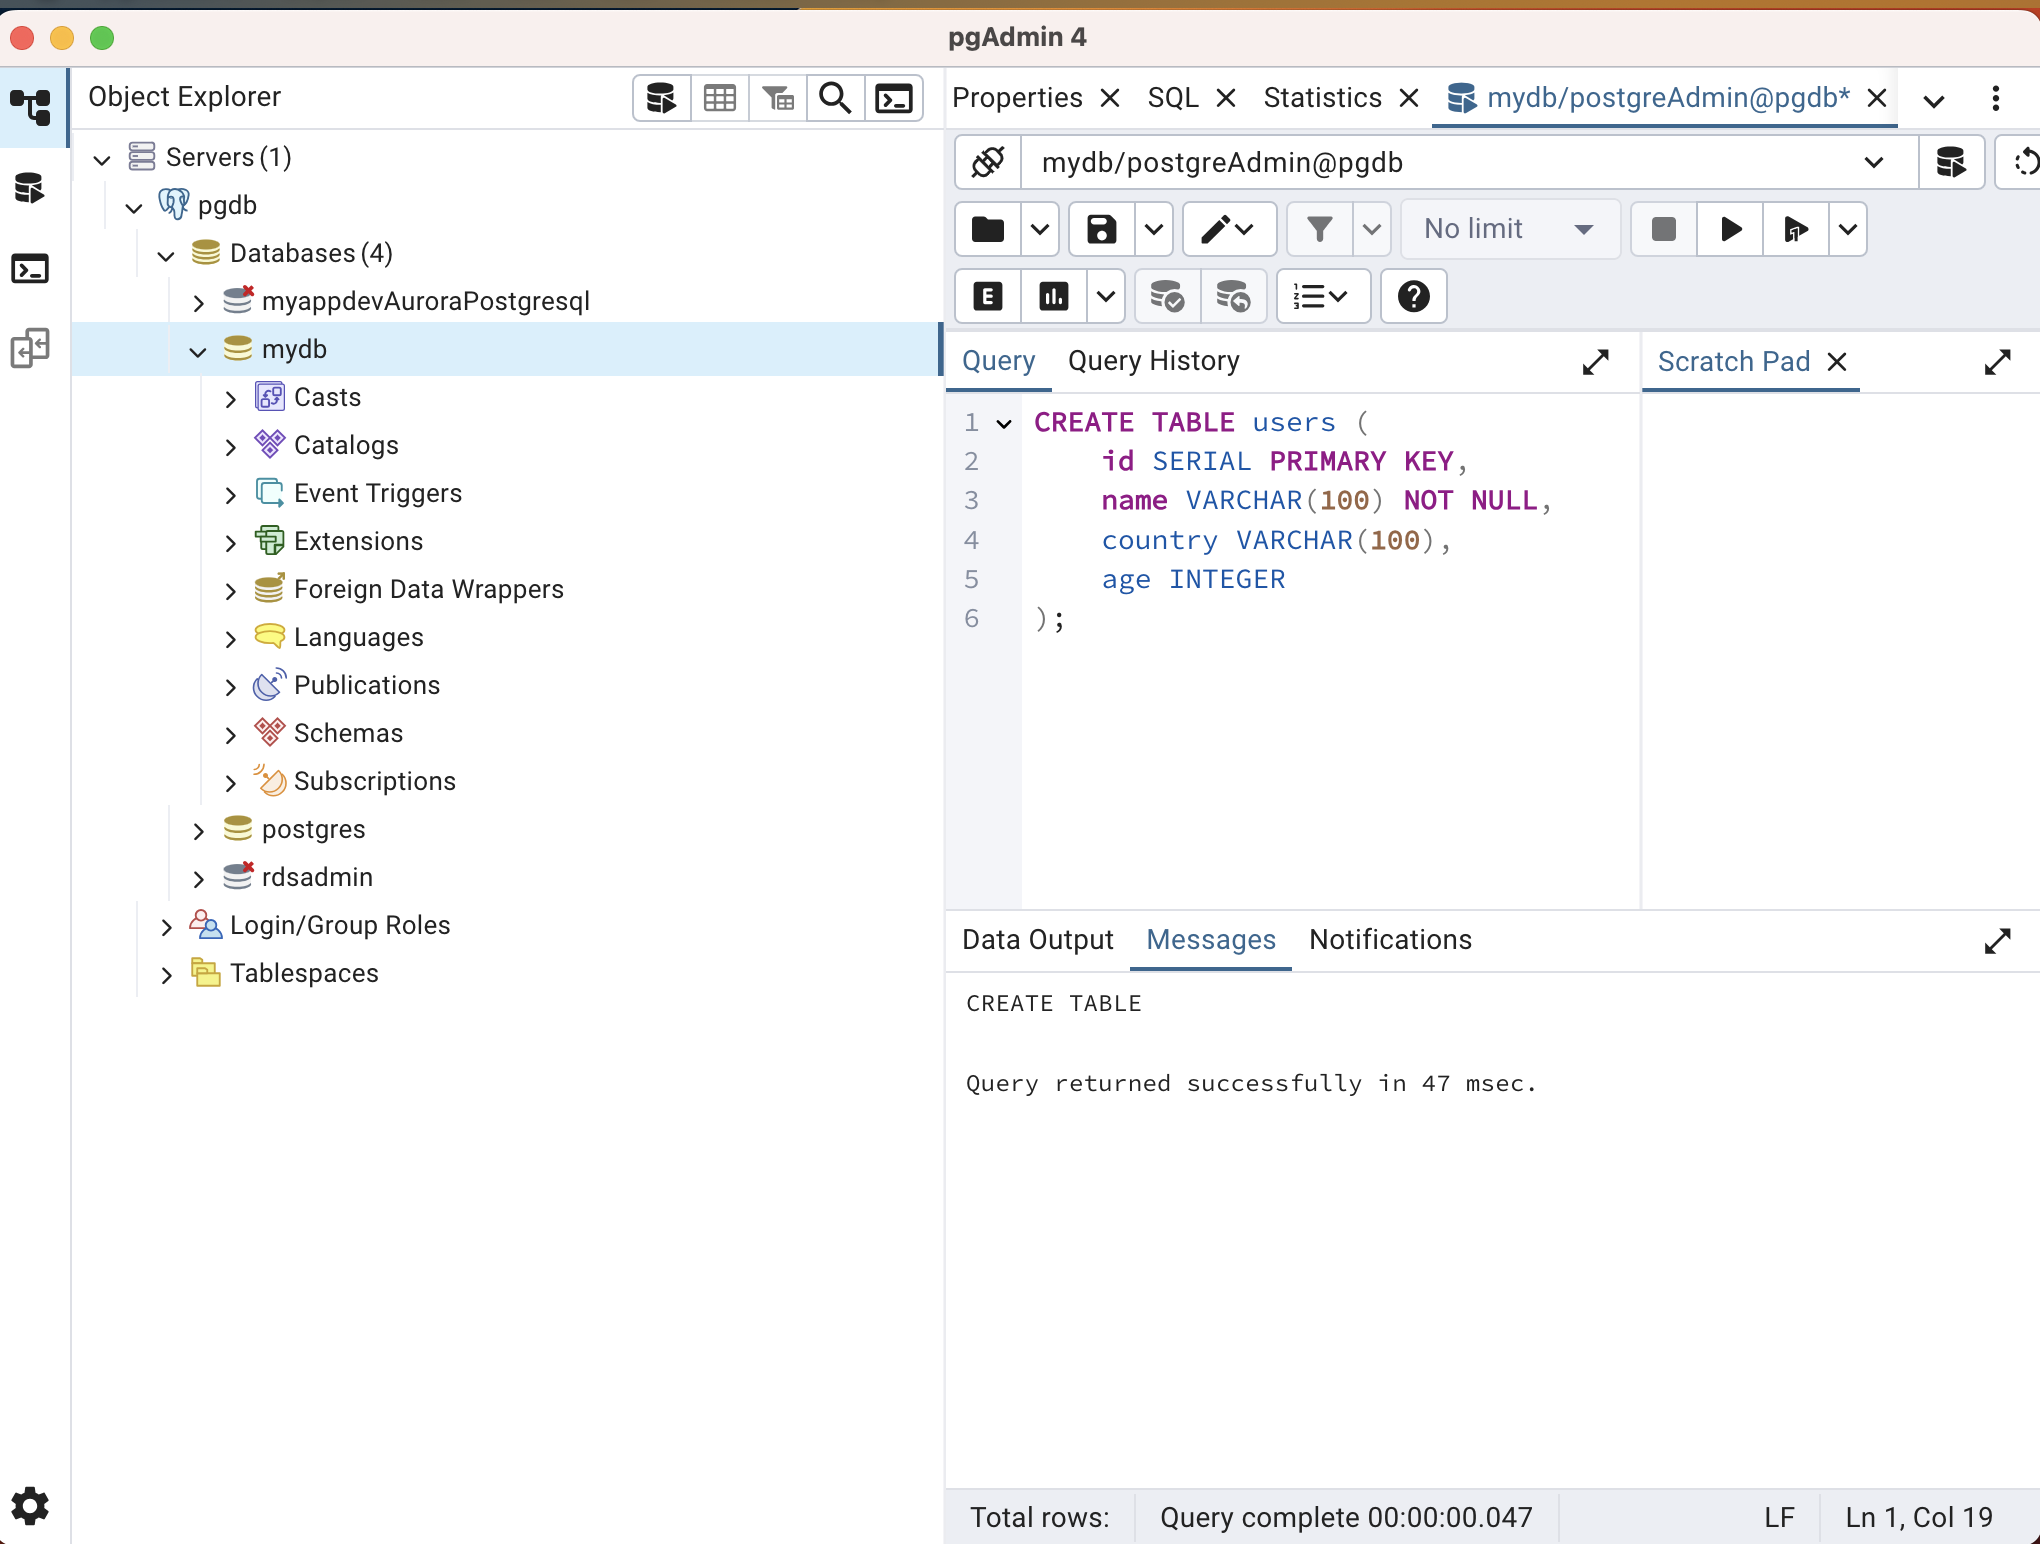
At this point, you can connect to the DB locally and the database and table used by the application are ready.
Deploying API Gateway + Lambda
Next, deploy the application that operates the database via API Gateway and Lambda.
Create Lambda Layer
First, create the Lambda layer for the psycopg3 PostgreSQL client.
Run the following script to build the layer:
[ec2-user ~]./build-layer.sh
This will return two ARN responses. Note the LayerVersionArn values for use in the upcoming CloudFormation deployment.
"LayerVersionArn": "arn:aws:lambda:us-east-1:<account-id>:layer:psycopg3-layer:1"
"LayerVersionArn": "arn:aws:lambda:us-east-1:<account-id>:layer:python-lambda-application-template-lib-layer:1"
Create Deployment Bucket
Create an S3 bucket to store the Lambda source code package for CloudFormation to reference.
[ec2-user ~]ACCOUNT_ID=$(aws sts get-caller-identity --query Account --output text)

[ec2-user ~]BUCKET_NAME="code-bucket-${ACCOUNT_ID}"

[ec2-user ~]aws s3api create-bucket \
--bucket $BUCKET_NAME \
--region us-east-1 \
--create-bucket-configuration LocationConstraint=<your region> # Add this option if creating in a region other than us-east-1
Build Deployment Package and Upload to S3
Build the deployment package for Lambda. Sample source code is already provided. After building, upload the zip file to the S3 bucket.
[ec2-user ~]./build-app.sh

[ec2-user ~]aws s3 cp .dist/app/sample_api/api.zip s3://$BUCKET_NAME
The ./build-app.sh script creates two deployment packages: .dist/app/sample_api/api.zip and .dist/app/sample_event/event.zip. The latter will be used later for the S3 + Lambda application.
Deploy the API Gateway + Lambda CloudFormation Stack
Deploy the stack using AWS CLI:
[ec2-user ~]aws cloudformation create-stack \
--regio us-east-1 \
--stack-name apigateway-lambda \
--template-body file://deploy/cloudformation/apigateway-lambda.yaml \
--capabilities CAPABILITY_NAMED_IAM \
--parameters \
ParameterKey=AppName,ParameterValue=myapp \
ParameterKey=EnvName,ParameterValue=dev \
ParameterKey=VpcId,ParameterValue=vpc-01187493c944a7ff0 \
ParameterKey=PrivateSubnet1,ParameterValue=subnet-0ba1ff7efe656281e \
ParameterKey=PrivateSubnet2,ParameterValue=subnet-0007df266992e3a06 \
ParameterKey=S3SourceCodeBucket,ParameterValue=$BUCKET_NAME \
ParameterKey=S3SourceCodeKey,ParameterValue=api.zip \
ParameterKey=DbHost,ParameterValue=db-postgresql-rqoopbocmcqq.cluster-chptakso6oan.us-east-1.rds.amazonaws.com \
ParameterKey=DbUser,ParameterValue=postgreAdmin \
ParameterKey=DbPassword,ParameterValue=SuperSecurePass123 \
ParameterKey=DbName,ParameterValue=mydb \
ParameterKey=AppLayerArn,ParameterValue=arn:aws:lambda:us-east-1:<account-id>:layer:python-lambda-application-template-lib-layer:1 \
ParameterKey=Psycopg3LayerArn,ParameterValue=arn:aws:lambda:us-east-1:<account-id>:layer:psycopg3-layer:1
After successful deployment, the API endpoint will appear in the Outputs tab. Use this endpoint for testing.
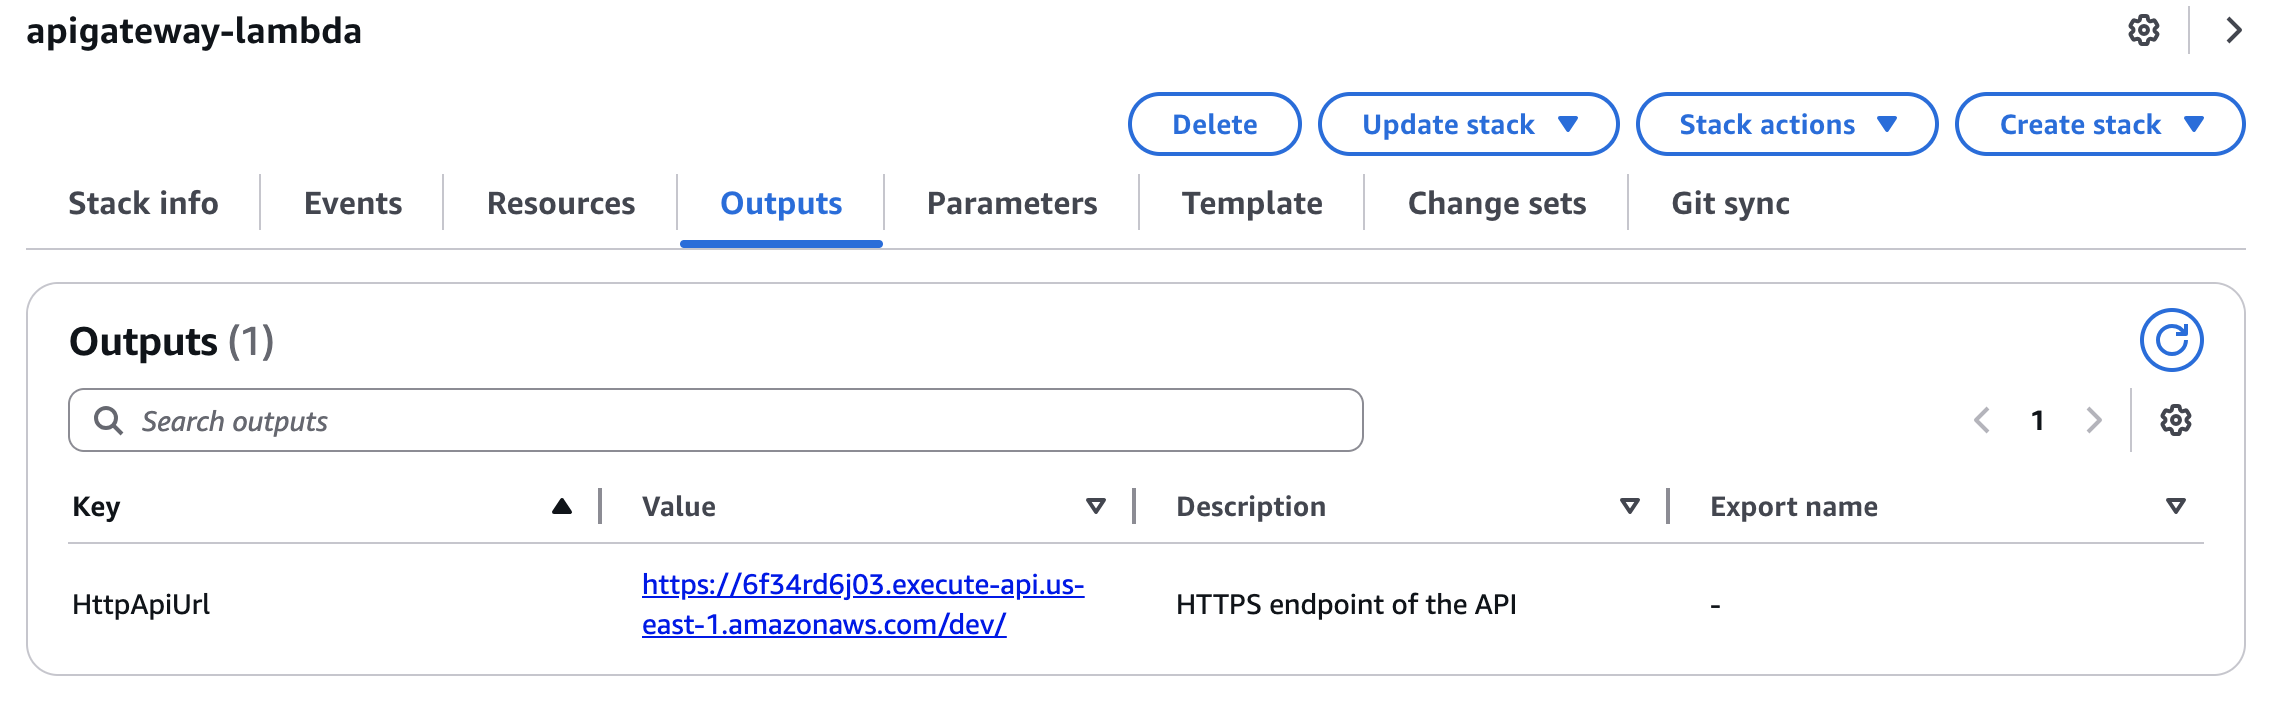
Test with a GET request like:https://<your API ID>.execute-api.us-east-1.amazonaws.com/dev/users?id=1
Use Postman or similar tools. You should see the user data (id=1) retrieved from the database.
(Note: Avoid using auto-incremented IDs for real applications; use UUIDs instead for better security.)

To insert user data via API, send a POST request to: https://<your API ID>.execute-api.us-east-1.amazonaws.com/dev/users
with the following body:
{
  "name": "horike",
  "country": "Japan",
  "age": "41"
}
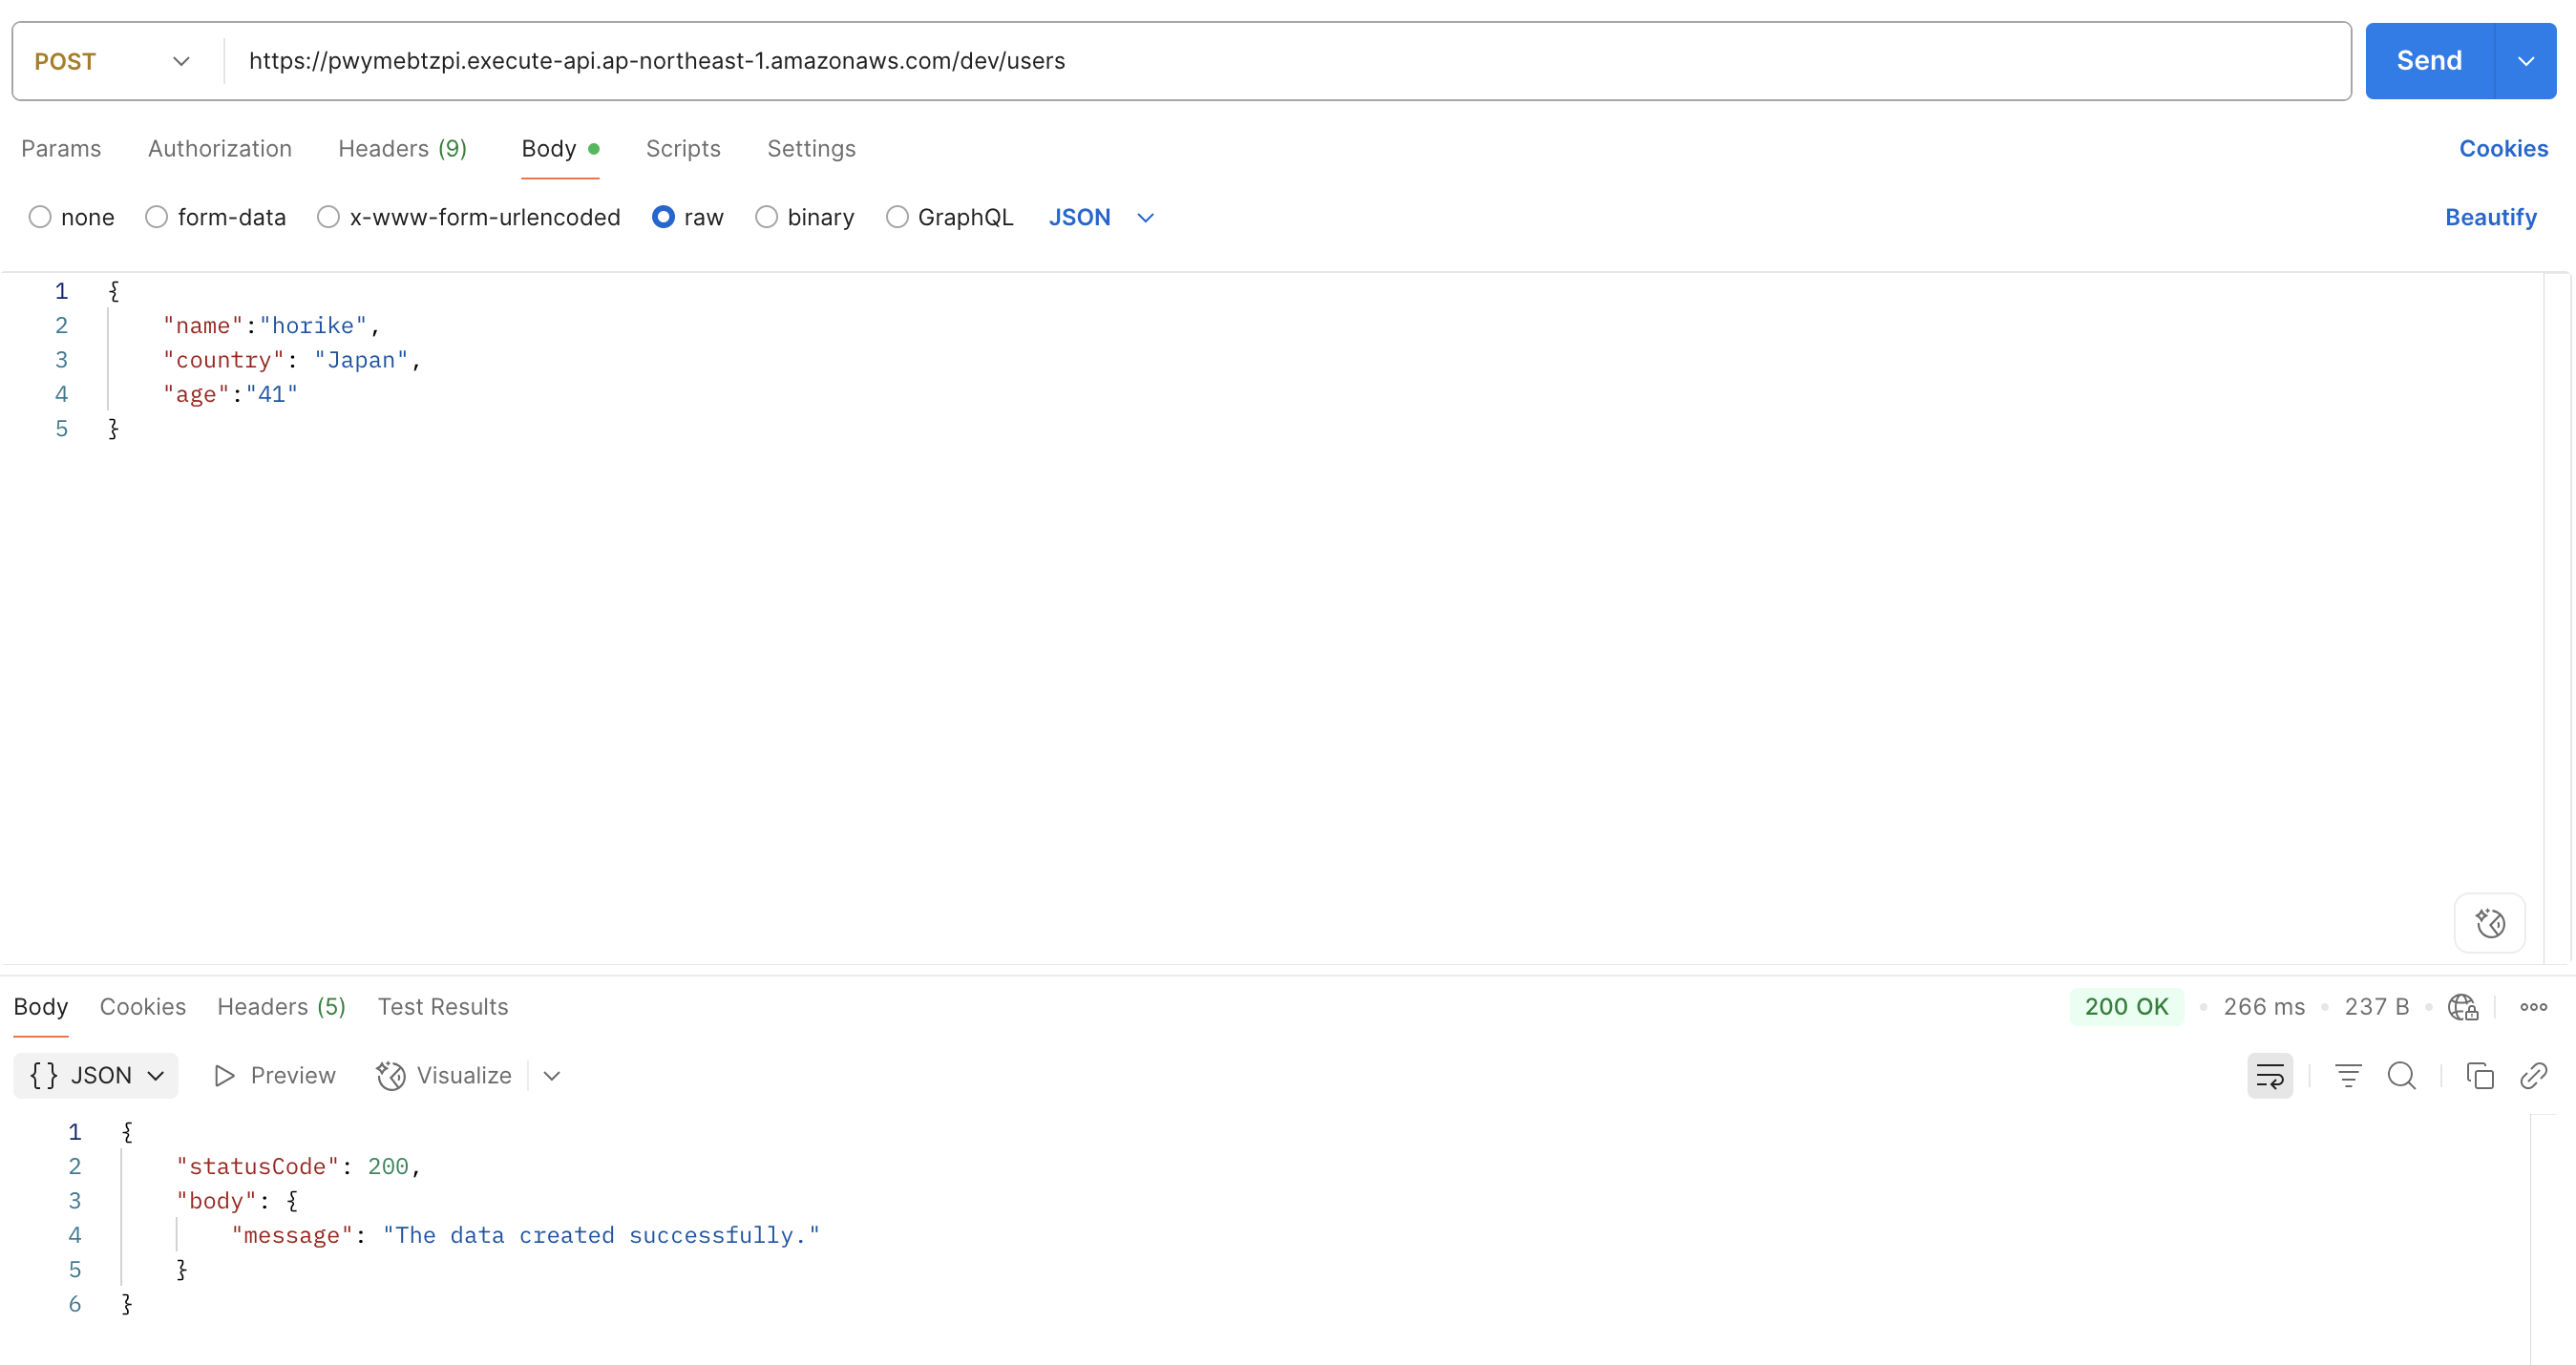
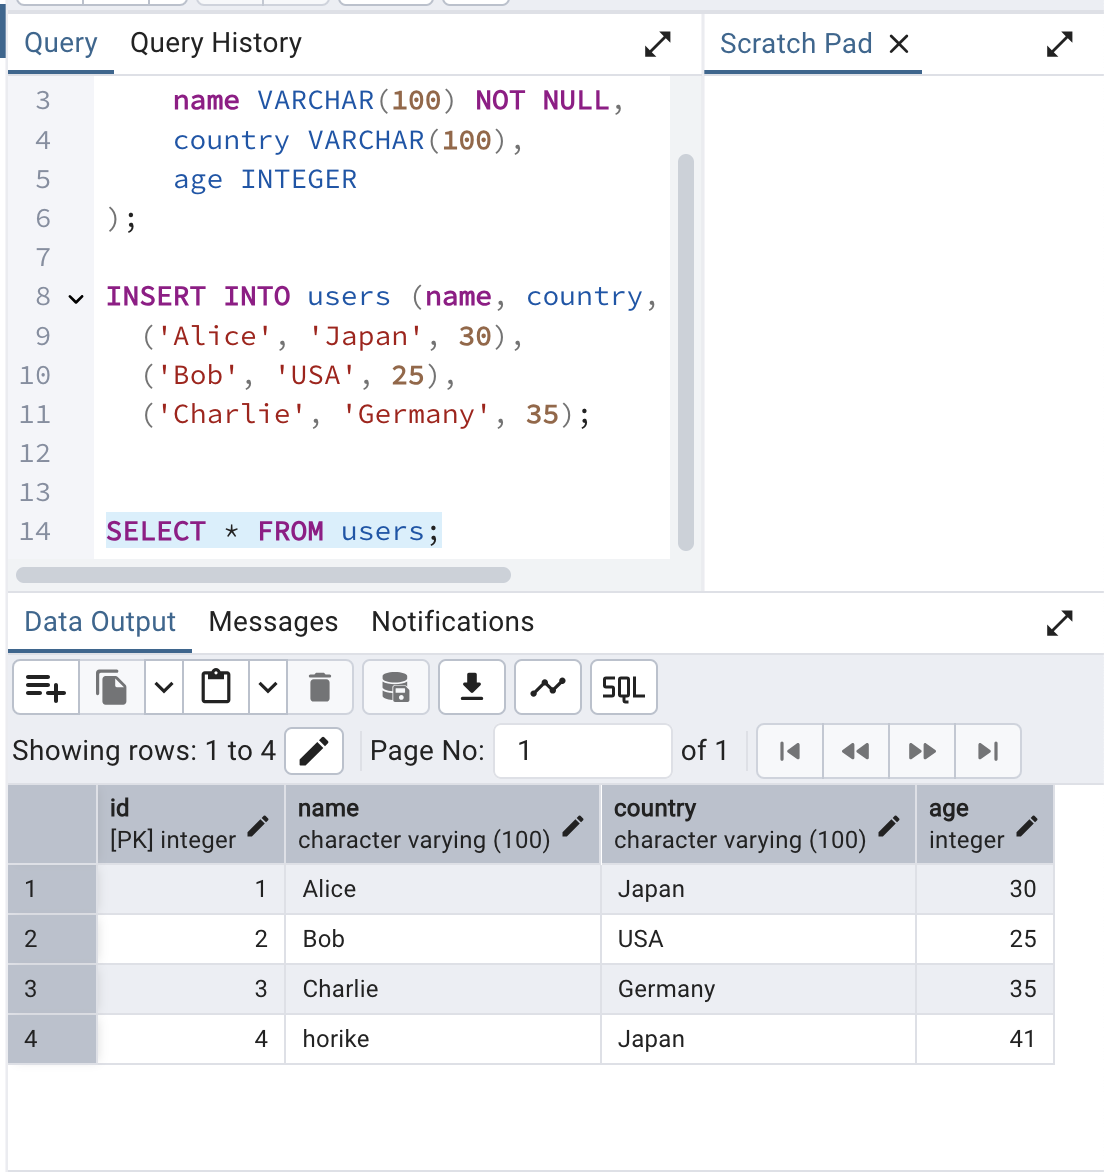
Verify via pgAdmin with a SELECT query.
Deploying S3 Event + Lambda CloudFormation Stack
This application registers user data into the database when a CSV file is uploaded to S3. A sample file sample_users.csv is provided.
name,country,age
Taro,Japan,30
Alice,USA,28
Bob,UK,35
Maria,Germany,25
Li,China,32
Upload Package to S3 for Deployment
The build-app.sh script already created the package for this application. Upload it to the S3 bucket:
[ec2-user ~]aws s3 cp .dist/app/sample_event/event.zip s3://$BUCKET_NAME
Deploy the Stack
[ec2-user ~]aws cloudformation create-stack \
--region us-east-1 \
--stack-name s3-lambda \
--template-body file://deploy/cloudformation/s3-lambda.yaml \
--capabilities CAPABILITY_NAMED_IAM \
--parameters \
ParameterKey=AppName,ParameterValue=myapp \
ParameterKey=EnvName,ParameterValue=dev \
ParameterKey=VpcId,ParameterValue=vpc-01187493c944a7ff0 \
ParameterKey=PrivateSubnet1,ParameterValue=subnet-0ba1ff7efe656281e \
ParameterKey=PrivateSubnet2,ParameterValue=subnet-0007df266992e3a06 \
ParameterKey=S3SourceCodeBucket,ParameterValue=$BUCKET_NAME \
ParameterKey=S3SourceCodeKey,ParameterValue=event.zip \
ParameterKey=DbHost,ParameterValue=db-postgresql-rqoopbocmcqq.cluster-chptakso6oan.us-east-1.rds.amazonaws.com \
ParameterKey=DbUser,ParameterValue=postgreAdmin \
ParameterKey=DbPassword,ParameterValue=SuperSecurePass123 \
ParameterKey=DbName,ParameterValue=mydb \
ParameterKey=AppLayerArn,ParameterValue=arn:aws:lambda:us-east-1:<account-id>:layer:python-lambda-application-template-lib-layer:1 \
ParameterKey=Psycopg3LayerArn,ParameterValue=arn:aws:lambda:ap-northeast-1:<account-id>:layer:psycopg3-layer:1
After successful deployment, an S3 bucket is created. Upload a CSV file to trigger the Lambda function and insert data into the database.
After the deployment is successful, an S3 bucket that triggers the event will be created. When you upload a user data CSV file to this bucket, the Lambda function will be invoked, and the data will be inserted into the database.
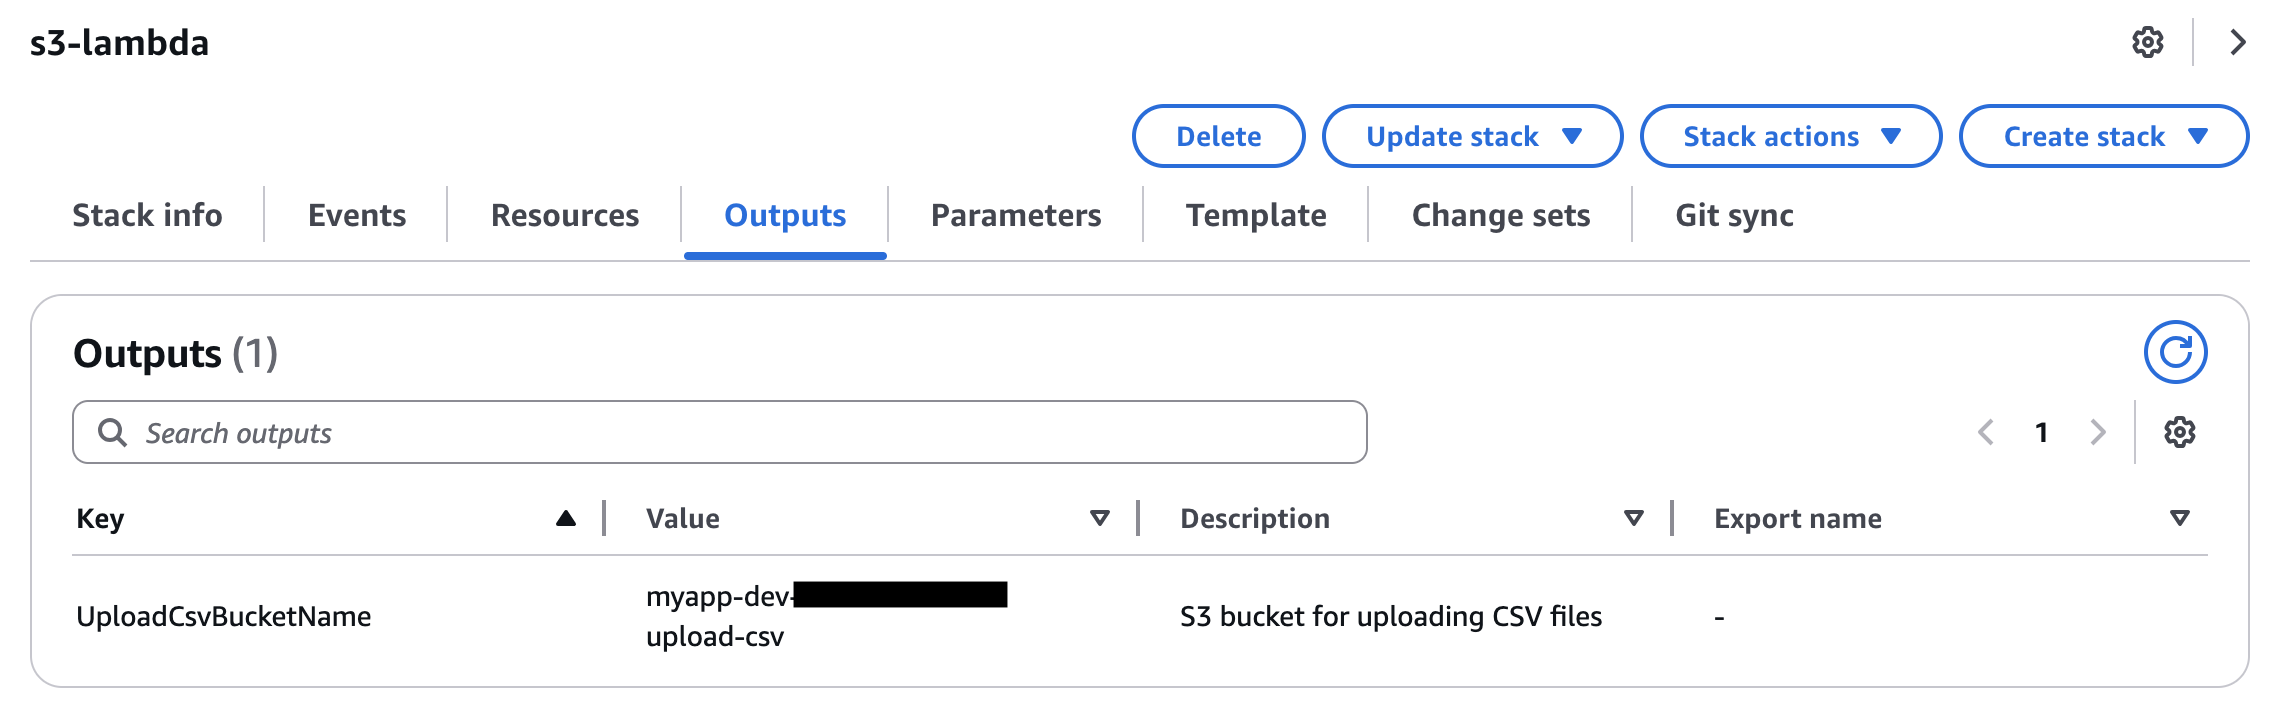
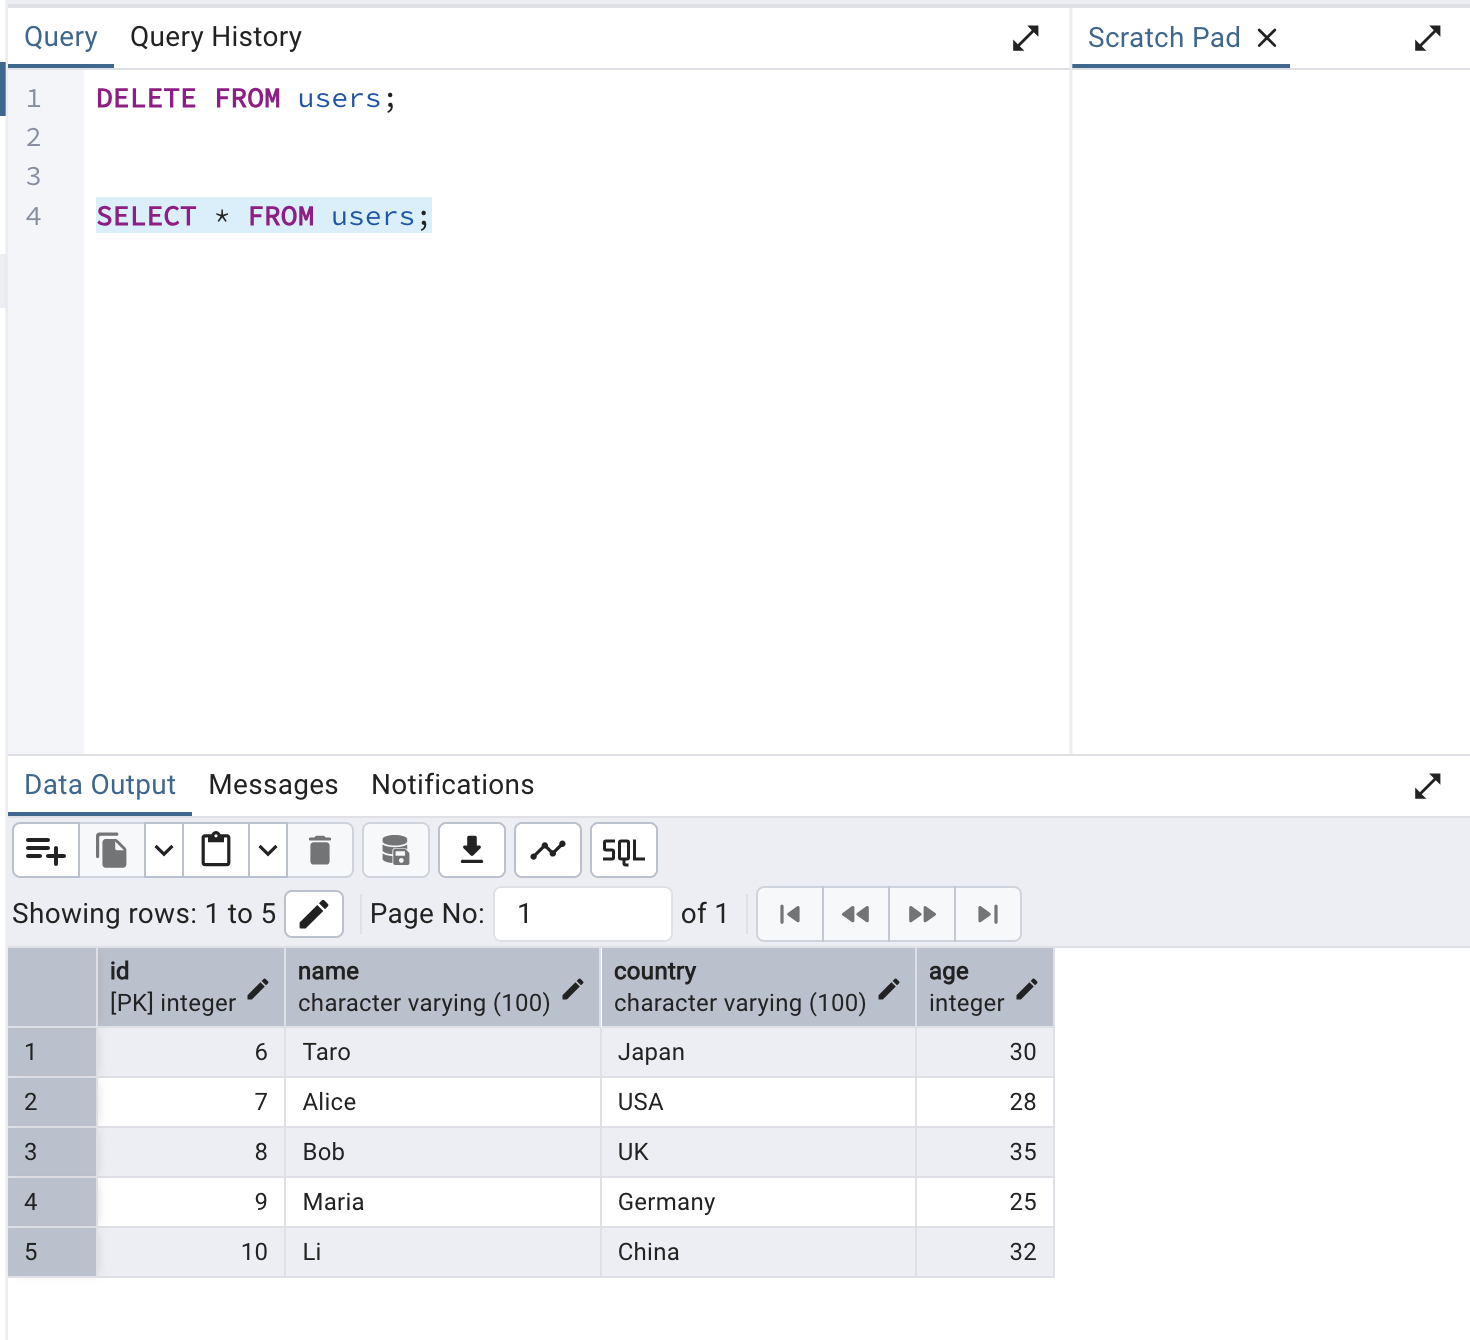
By uploading the test CSV file using the following command and checking in pgAdmin, you can confirm that the CSV data has been correctly stored in the database.
[ec2-user ~]aws s3 cp ./src/sample_users.csv s3://myapp-dev-<account-id>-upload-csv
Check via pgAdmin to confirm the data was inserted successfully.
Local Development
Local development uses dedicated Python scripts, a PostgreSQL container, and a MinIO container (S3-compatible storage). Start the containers defined in docker-compose.yml:
[ec2-user ~]docker compose up -d
Creating Tables
Run the provided Python script to create the database and users table in the containerized PostgreSQL instance:
[ec2-user ~]poetry run python ./src/.init_db.py
You can also use psql, the PostgreSQL CLI tool, which is pre-installed. Example:
[ec2-user ~]psql -h localhost -U admin -d mydb

mydb=# INSERT INTO users (name, country, age) VALUES
('Alice', 'Japan', 30),
('Bob', 'USA', 25),
('Charlie', 'Germany', 35);

mydb=# exit
Running API Locally
GET API
.local.sample_api.get_users.py simulates a GET request to retrieve user data. The generate_http_api_request_payload function generates a mock API Gateway event. Modify the following to test different query strings:
QUERY_PARAMS  = {
    'id': '1'
}
Run:
[ec2-user ~]poetry run python ./src/.local.sample_api.get_users.py
API Execution Result: {"statusCode": 200, "body": "{\"statusCode\":200,\"body\":{\"name\":\"Alice\",\"country\":\"Japan\",\"age\":30}}", "isBase64Encoded": false, "headers": {"Content-Type": "application/json"}, "cookies": []}
POST API
.local.sample_api.post_users.py simulates a POST request to create a user. Modify the BODY variable as needed:
BODY = {
    "name": "Shigeo",
    "country": "Japan",
    "age": 30
}
Run:
[ec2-user ~]poetry run python ./src/.local.sample_api.post_users.py
API Execution Result: {"statusCode": 200, "body": "{\"statusCode\":200,\"body\":{\"message\":\"The data created successfully.\"}}", "isBase64Encoded": false, "headers": {"Content-Type": "application/json"}, "cookies": []}

$ mydb=# SELECT * FROM users WHERE id=4;
id |  name  | country | age
----+--------+---------+-----
4 | Shigeo | Japan   |  30
(1 row)
Running S3 Event Locally
For S3 events, MinIO is used to simulate S3. Run the following script to create a test bucket and upload sample_users.csv:
[ec2-user ~]poetry run python ./src/.init_minio.py
MinIO cannot trigger Lambda directly, so .local.sample_event.import_users.py generates the event payload and runs it locally. Run the script and check the database:
[ec2-user ~]poetry run python ./src/.local.sample_event.import_users.py
mydb=# SELECT * FROM users;
id |  name   | country | age
----+---------+---------+-----
1 | Alice   | Japan   |  30
2 | Bob     | USA     |  25
3 | Charlie | Germany |  35
4 | Shigeo  | Japan   |  30
5 | Taro    | Japan   |  30
6 | Alice   | USA     |  28
7 | Bob     | UK      |  35
8 | Maria   | Germany |  25
9 | Li      | China   |  32
Unit Testing
Sample unit tests using pytest are provided in the tests directory. They use PostgreSQL and MinIO containers and include both validation and success scenarios.
Run tests with:
[ec2-user ~]poetry run pytest